Fitness And Health


Workouts are very important for the body to shape up, slim down, or strengthen. Regardless of what you do, habitual workouts and physical activities are the trail to a healthy and well fitted body. Daily workout for the body burns fats, calories, build up muscles, lowers cholesterol, relieves stress and unease and also lets us sleep peacefully.

If you’re doing a healthy nutrition plan, workouts can improve your body development. Whether you’re a beginner to fitness or have been working out for so long, it is also important to track your diet to get the best results for your body.

Studies have revealed that high-intensity workouts can help burn fat and calories. In addition, with the accumulation of strength-training workouts, these can help you not only boost your metabolic rate but also change your body’s work of art.

When you work out, you become aware of several things about your body. You respire heavier and faster, your heart beats more rapidly, your muscles in pain and you sweat a lot. These are all usual responses to workouts whether you work out habitually or only once in a while. These are good signs that your workout is great. It is not impossible that if you work out regularly, you will be in a very good shape in no time.

Working out is the marvelous treatment to keep our body in a good and healthy state. It’s important that if you want to live a healthy and satisfying life into old age, working out regularly and good exercise is truly what you need.


Training With A Tire


ImageImageImageTire training can add a new dimension to your strength and conditioning program regardless of what sports you play or your level of athletic ability. When people hear me speak about adding tire training into a strength program they often have the mistaken impression that tires are only used by athletes who compete in strongman contest.

The strength and aerobic benefits of tire training can enhance your performance in all sports from gymnastics to football. Tire training is one of the best total body strength and conditioning workouts that a person can do. You use your total body when you flip the tire, and by varying the distance you flip the tire and time you flip the tire you can get a great aerobic workout.

Where Do You Get A Large Tire?

The best place to go to find a large tire is at a tire dealership that deals in farm tires or a tire dealership that deals in earth moving equipment tires. Normally these places will be more than happy to give you the used tires. Even in cities there is usually a dealership that works with earth moving equipment. I found my large 800-pound tire discarded as trash in a field about an hour from my home.

All I had to do was borrow a friend’s pickup truck and have my father-in-law help me roll it up a ramp into the truck bed. Finding a tire in the weight you want may take a few phone calls and maybe a little travel, but it will be worth it. If you can get the tire’s make and model number, the tire store or manufacture can give you the weight of the tire new. You can deduct weight based on the ware of the tire and get a pretty good estimate of your tire’s weight.

What Weight Of Tire Should I Get?

If you are involved in strength contest get a starting tire of 650 pounds or more because most of the tires used are in the 700-800 pound range. For those who just want the tire for fitness and a good total body work out you may want to get a tire in the 200-300 pound range.

How Do You Flip The Tire?

When you flip the tire it is best to start with the tire flat on the ground. Place your fingers and hands as far under the tire as you can in this position and keep your hands about shoulder width apart. Squat down and then while pulling the tire up with your arms and back explode out of the bottom position. As the tire comes up you should have enough momentum that you can change your hands from a pulling to a pushing position and push the tire all the way over. Immediately after the tire is pushed over and flat start the process again.

In the beginning you may have to use your knee to pop the tire up high enough so that you can change hand positions to a pushing motion. Try to get away from using your knee as soon as possible to avoid possible leg injury when you have one leg planted on the ground and one in the air. You can flip the tire on any type of surface from concrete to grass to sand.

Sample Programs

I would incorporate tire training into your work out one or two days a week. You can work on strength and speed one work, and you can focus on conditioning and strength the next workout.

Workout #1
Flip the tire over a 70-meter course for time. Have someone time you on each set and keep track of your times. As you progress you should be able to get quicker as you continue to train. 3-4 sets.

Workout #2
Set up a 70-meter course. Flip the tire up and down the course as many times as you can in a 90-second or 2-minute period of time. Keep track of the number of flips you achieve each set. As your endurance increases you should be able to flip the tire more times in the time limit. If the 2 minutes gets to be too easy increase the time that you flip the tire in 30-second increments. 3-4 sets.

Workout #3
Make the tire flip part of a medley of events. Pull the sled for 70 meters and then flip the tire back for 70 meters. Another variation would be to pick up and carry sand bags 70 meters and load the sandbags into the sled. Pull the sled back 70 meters and then flip the tire back 70 meters. Start with 2 sandbags and work up to 3-5.

With these programs feel free to increase or decrease the distance of the events or the weights. The main thing is to get out and train using these alternative methods to help take you to the next level of athletic achievement.

Your friend in strength,

Dave

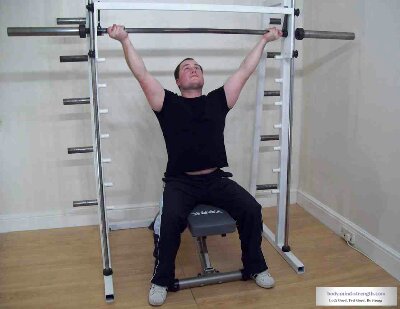
Watch “Seated Barbell Reverse Shoulder Press with Wide Grip” on YouTube


https://www.youtube.com/watch?v=skhvIw6xRs4&feature=youtube_gdata_player… I started doing Reverse Grip Shoulder Presses years ago after seeing Charles Glass doing them. I still do em today but with a grip a little more than shoulder width apart. This video will take you step by step. It is a whole new feeling in the front, side and rear deltoid area you can perform this movement either on a Smith Machine or with a free barbell which is what I prefer since I do not care for machines but it’s just how I feel… Start by removing all of the weight from the bar, twist it to remove it from the supports and set it to a height around the height of your upper chest. Next slide weight bench length ways into the smith machine and add a suitable amount of weight to the bar. Sit down on the end of the weight bench facing the bar. Position your legs either side of the with your feet well planted for stability. Make sure that you are positioned so that the bar will come down right in front of your face. Reach up to grip the bar with your arm in a L-shape position with your palms facing upwards. Press the bar slightly, twist it and remove it from the support brackets. Inhale as you lower the bar down in a slow, controlled manner keeping your back straight until the bar is in front of your face. Do not allow your shoulders to hit a resting point. Exhale as you press the bar back into the starting position keeping your back straight not allowing your lower back to arch. Do not allow your arms to fully lockout before starting the next rep. I press weight up short of lockout and as I lower weight I stop to the point where I still have tension on my muscles. Hope you can utilize this fantastic movement in your shoulder routine.

image

image

image

Warrior

Dumbbell Bicep Curl


Proper placement of the elbow during the dumbbell bicep curl!

Notice the elbow placement in the side by side comparison pictures! The elbow placement on the left side picture is optimal for keeping 100% tension on the bicep muscle (Directly on/above the hip bone – proper/ideal form for maximum growth) Notice the elbow placement on the right side picture, as the weight is curled up, the elbow has moved 8-10 inches in front of the hip bone (This is a common mistake a lot ppl make when using a dumbbell or weight that is to heavy for the bicep muscle to handle, so as it is curled up, instead of the elbow remaining on/above the hip bone where it should be, the front shoulder muscle brings the elbow forward to assist with the lift taking a lot of the tension off the bicep)

Remember – Correct form and proper function are everything when strength/weight training!

Dave

Watch “Hostyle Conditioning Bench Press and Kettlebell Snatch Hybrid Workout” on YouTube


https://www.youtube.com/watch?v=_r9DURg_u8A&feature=youtube_gdata_player… My friend Curd Hos is the owner of Hostyle Conditioning and is big on kettlebell training. If you have been using kettlebells or have been thinking of incorporating them into your training watch this fantastic video as Curd explains his style.

Dave

Watch “How to – Reverse Biceps Curls” on YouTube


Stand up with your torso upright while holding a barbell at shoulder width with the elbows close to the torso.
The palm of your hands should be facing down (pronated grip). This will be your starting position.

While holding the upper arms stationary, curl the weights while contracting the biceps as you breathe out. Only the forearms should move.

Continue the movement until your biceps are fully contracted and the bar is at shoulder level.

Hold the contracted position for a second as you squeeze the muscle.

Slowly begin to bring the bar back to starting position as your breathe in.

Repeat for the recommended amount of repetitions.
Variations: You can also perform this movement using an E-Z attachment hooked to a low pulley. This variation seems to really provide a good contraction at the top of the movement. You can also use an E-Z bar as well. For more great videos visit my friends at Critical Bench.

image

Dave

How Does the 10 x 10 Training Routine Work


There are two reasons why the 10 sets of 10 reps training routine works….

#1. The exercises chosen are multi-jointed exercises that target the majority of the muscles of the area being trained. For example, for the Quadriceps routine, exercises like the Squats and Lunges pretty much stimulate all of the leg muscles.

#2. The nervous system and the muscles are completely shocked by having to perform the same movement repetitively over and over again for 10 sets of 10 repetitions with limited rest in between sets. This shock in turn leads the body to super compensate by increasing the size of the targeted muscle fibers.

How to Target All Muscles

The key to a complete physique is to have a balanced development of all muscle groups. Because the 10 sets of 10 reps routine makes use of basic exercises that target the majority of the fibers from the muscle group being worked on, you will achieve balanced development. In addition, a technique I recommend to more advanced athletes, is to change the exercise used every time you workout as well. So for example, if in your last leg workout you used squats with a medium stance, the next workout you can use lunges, and the next one squats with a wide stance, etc. This not only provides further variety to the body (thus providing even more shock to the muscle) but it also helps to further ensure balanced development.

The 10 sets of 10 reps method has proven time and time again to be fantastic at increasing muscle mass through the systematic fatigue of the muscle fibers being worked on. In order to implement a 10×10 routine, a mass building exercise is chosen and a weight that you can perform for 15 reps or so is selected. However, you will stop once you achieve 10 reps. Your rest in between sets should be limited to a minute and you need to refrain yourself from resting more as you start fatiguing since increasing the rest time would defeat the purpose of the routine, which is to cause systematic fatigue on a specific muscle. The goal of the routine is to use the same weight for all ten sets and to be able to perform all sets for 10 reps in good form. You will notice that as fatigue sets in, the sets become more and more challenging. You may not be able to perform all sets for 10 reps. If that is the case, then start lowering the weight once you do a set where less than 10 are performed. Once you can do all 10 sets for 10 reps, then it is time for you to go up in weight.

Is there a need for more exercises once you do the one for 10 sets of 10? I always like to include a second exercise for the larger muscle groups in order to hit a different angle but the second exercise is more of an isolation type and I just perform it for 3 sets of 10-12 reps.

image

image

image

Posted from WordPres

Watch “California Press – Tricep Exercise” on YouTube


The California press is a hybrid movement which is actually a cross between a close-grip bench press and a lying triceps extension. It’s a very popular assistance movement used in powerlifting circles, particularly by those lifters who need to increase triceps mass and strength to bring their bench press poundages upward.

Get in the same start position as the close-grip bench and lower the barbell. But instead of lowering to the lower pecs, lower it to the upper pecs by allowing the elbows to pivot forward as you lower the bar. At this point, the forearms will come into contact with the biceps, the bar will be touching the upper chest, and you’ll experience a great stretch in the triceps.

From this position, push the bar away and upward from your chest. The elbows should come just of short of lockout when you get to the top position.
A good starting weight would be about halfway between what you use in the lying triceps extensions and the close-grip bench press. I have been using this movement in my triceps arsenal for quite a few years. Every now and then I put it in rotation when I switch up my routine. I’m sure you will enjoy this old school movement.

Posted from WordPres

Core Strength


For lots of people, the core means the abdominal muscles;
however, technically your core includes 29 muscles that run
down to your thighs and up your back. In addition to helping you
showcase 6-pack abs, your core is the root of your strength and
you need a strong core to do just about everything active, from
kicking to lifting to just standing up straight.
If you’ve been working on your core, you’re probably all-too
familiar with crunches and sit-ups. To get the most from a core
workout, you should try to alternate the exercises you do daily to
get the most benefits from muscle confusion. In addition to (and
sometimes instead of) your usual sets of crunches, try the plank,
jackknife, side plank, bridge, bicycle, superman, and quadruped
exercises. For hanging knee raises, try hanging straight from the
pull-up bar with your legs together. Bring your knees up slowly
towards your chest and hold for several seconds. Also, at the
gym, scan the room for the ab crunch machine and rotate that in
to your weights routine.
For another twist on the core exercises you already know,
perform them on a fitness/stability ball. Choose a ball that
allows your legs to be at a right angle when you’re sitting on it.
Incorporate the ball into your normal crunches, planks, and
push-ups. Also, try squeezing it between your lower legs while
you lie on your back. Then raise it up slowly off the floor and
hold for several deep breaths before you lower it back down
gradually.
There are a wide variety of core exercises out there.
Unfortunately, none of them alone is the single answer to the
ultimate 6-pack abs. Instead, when you’re working your core,
keep these final tips in mind:
Challenge yourself and rotate through a variety of these
exercises every week for muscle confusion benefits.
Look out for new exercises and sports that will work multiple
core muscles simultaneously – these will be more effective for
you in the long run than simpler isolation exercises.
Perform repetitions slowly and deliberately – you should feel
your abdominal muscles burn. Quality is more important than quantity of
reps.
Make sure you are breathing through the exercise. Your instinct
may be to hold your breath, but it is better for your muscles if
you breathe throughout.
Finally, as always, if a position feels awkward or strains your
back and/or neck, swap it out for a different one. A few more
reps is never worth an injury that sidelines you for weeks!

image

image

Posted from WordPres

“Straight Arm One-Arm Dumbbell Row”


Single-Arm Straight Arm Dumbbell Row
Free Weights/Muscles Involved are Lats/Middle Back/Traps/Shoulders/Forearms/Triceps/Lower Back…. How to do the Single-Arm Straight Arm Dumbbell Row – Learn Proper Single-Arm Straight Arm Dumbbell Row. You can watch the above video for a complete breakdown on how to perform this awesome movement.
Step 1: Take a dumbbell in your right arm and place your left hand on your left knee to brace yourself.
Step 2: Bend slightly at the knees and bend over at the waist so that your chest is parallel with the floor.
Step 3: Let your right arm hang down (starting position). Keep your arm straight and lift the dumbbell back towards your glutes.
Step 4: Bring it back down to starting position, repeat this motion for the desired amount of repetitions and then switch arms.

Posted from WordPres